How to change DNS on a MAG device
We’re about to guide you to use this method to bypass to restriction of your ISP accessing IPTV servers.
Before getting start
Before you change to any DNS address, make sure you write down your current DNS address so you can keep these numbers in case you need to get back to your original settings. [Step 3]
Note: If your original settings were set to “Automatic”, just change your DNS settings back to “Automatic”.
To go to the inner portal of the mag device, just turn off your Wi-Fi internet, or if you are using the Ethernet cable leave it disconnected. Now if you reboot the mag device, after reboot, it will stop in “page loading error”. From here you can choose “System Settings”.
Step 1: Go to “Settings”. Find the “System Settings” find the “Network” Tab and click on it.

Step 2: Click on “Wired Ethernet” if your device is connected by wire [In this tutorial we covered the Wired one, the syntax is the same for the wireless. Click on “Wireless (Wi-Fi)” If you’re connected by Wireless.

Step 3: In the next tab find the “Auto (DHCP), manual DNS” and click on it. Now, try to test with the below DNS
Google DNS [We used for this tutorial]: 8.8.4.4 and 8.8.8.8
Open DNS: 208.67.222.222 and 208.67.220.220
Cloudflare DNS: 1.1.1.1 and 1.0.0.1

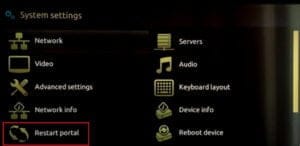
Step 4: Once set, press the back button & “Restart the portal” as shown below & you’re done!
Thanks.